

Over many years, I have become very adept at making MS Excel do my bidding. The sections listed to the left are the topics on which I have chosen to opine. I will assume that a reader has a basic knowledge of excel and ergo will keep to the advanced topics.
I first started using Excel to process large amounts of data. My first application involved evaluating foundations for an airport terminal with a huge footprint. As the tasks expanded, so did the reserve of toys to do the job. I will try to summarize the tools below, and not buture the English language too badly.
Before I start getting into functions, I must get into the various ways to create cell references. The most common way to reference a cell is by its grid address, such as 'A3'. When you use the grid address in a function, you may notice that the reference will change when you copy the formula. This can be valuable or a nuisance. If you want the cell reference to remain static, you can add '$' before the grid address to lock the reference. Using 'A3' as an example, you can lock the reference by typing '$A$3'. If you only want to lock the column reference then type '$A3'. Likewise you can lock the row reference by typing 'A$3'. This is an important way to control how references move when creating calculations.
Before I start getting into functions, I must get into the various ways to create cell references. The most common way to reference a cell is by its grid address, such as 'A3'. When you use the grid address in a function, you may notice that the reference will change when you copy the formula. This can be valuable or a nuisance. If you want the cell reference to remain static, you can add '$' before the grid address to lock the reference. Using 'A3' as an example, you can lock the reference by typing '$A$3'. If you only want to lock the column reference then type '$A3'. Likewise you can lock the row reference by typing 'A$3'. This is an important way to control how references move when creating calculations.
You can also lock the references by hitting 'F4' while you will cycle through the locked cell options: $A$3; $A3; A$3; A3
Besides Cell Addresses, there are many ways to reference cells in functions. I will get into two of them: Name Box(Red Oval), Name Manager(Blue Oval).
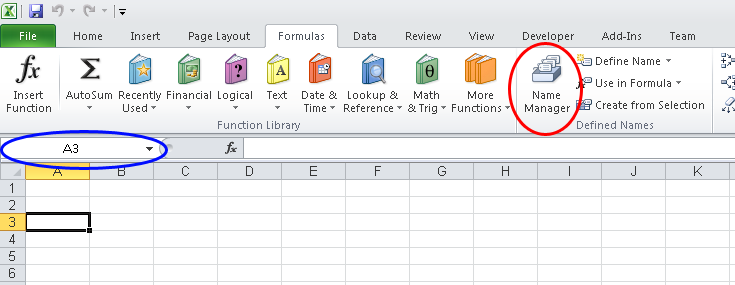 Image 1: Cell Reference
The Name Box is a way to rename a cell reference. If you have a value that will be used repeatedly in your sheet, it may make sense to rename the cell. Once you rename the cell, you can still reference the cell with the address. But you can also reference it with the new name. The image below shows cell 'A3' renamed to 'Test'. Now any calculation that references 'A3' can reference 'Test' as an alternate.
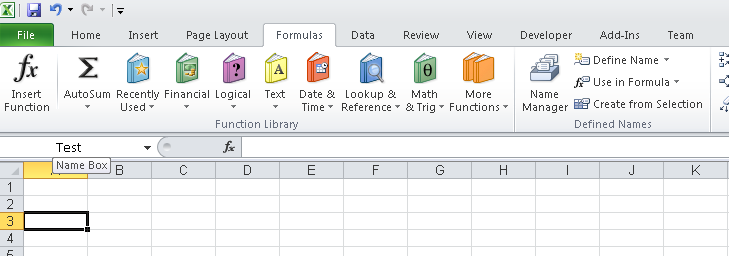 Image 2: Renamed Reference
The name is stored in the Name Manager. To undo this change, you must delete the Name from the Name Manager.
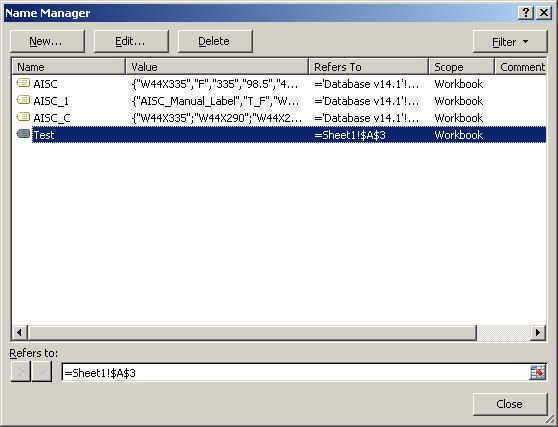 Image 3: Name Manager
The Name Manager is a powerfule tool used to create alternate references to both individual cells or to multidimensional ranges. The image above shows a 'AISC', which is a 2D array covering a steel shape library that will be used in future examples. 'AISC_1' is a 1D array that covers Row 1 of the 2D 'AISC' Range. 'AISC_C' is a 1D array that covers Column C of the 'AISC' Range. Both of these will also be used in future examples. The name manager provides adequate explanation of how to setup.
With making yo aware of the Name Manager, I can proceed to using functions that will use this tool. I will show examples with names and without names to help show how it can be used.
Horizontal and vertical lookups were the first tools that I discovered. These let you lookup a defined value based on a specified input. The three steps to use this are: 1. Create a database with a unique ID. 2. Determine the column or row number of the data being searched. 3. Create the lookup function.
			= HLOOKUP(Lookup Value,TableArray,RowIndex#,[RangeLookup])
			= VLOOKUP(Lookup Value,TableArray,ColIndex#,[RangeLookup])
The For both the horizontal and vertical lookups, the format of the inputs is the same. The Excel Help File gives a thorough, if not decent, explanation of how to use the function. The excel file listed in the left column has working examples of the functions I will be describing below.
The beginning of the process is to setup a table of values; and in my example, AISC creates the database for my use. The database can be setup in several ways, but I recommend making the first column the unique ID that you will use to distinguish search the database. I would usually place a counter cross the top to help identify the columns number for a given variable. The image below is of the AISC Shapes Database, which I use to look up steel section properties.
 Image 4: AISC Database
The image above has rows containing the AISC sections W14X90 and W12X53 highlighted, because those values will be found by the functions in the image below. Note the image below shows six lookups based on the yellow input cells. Below the lookup implementation are the text inputs that are used in the functions. The first one uses general cell references and the second one uses a Name Manager value to define the same range of cells.
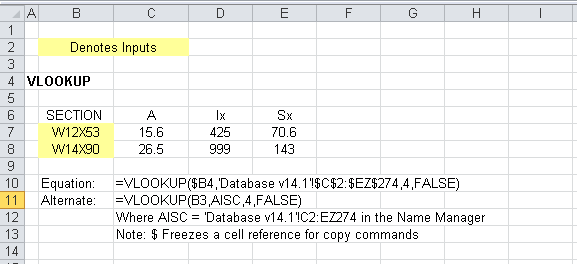 Image 5: VLOOKUP
Hopefully, I have provided enough information for you to try to build your own VLOOKUP functions. Go into the VLOOKUP help files online for more information.
A good alternate to VLOOKUP is an Index Match function. Fittingly named, it utilizes the Match function to identify the matching cell in a set and returns the row or cell number. The index function in then used to get the i-th value from another set. The greatest benefit of this type of function over the VLOOKUP is that it can search a dataset in two axes simultaneously. This is because the index function can index both rows and columns. If you create a match scenario of the row and column, you can get a value from a 2D search space. The image below has examples of both one and two dimensional functions.
 Image 6: INDEX MATCH
My personal preference is for the VLOOKUP over the INDEX-MATCH becasue less setup is required. But both are valid tools for obtaining useful data form a large database.
Array functions operate on ranges of values. They are often referred to as CSE funcitons because of the process to activate them. Once the function is created, before you leave the cell, you much hit CTRL + SHIFT + ENTER to activate the array tool. This three key chord adds curly brackets ({Function}) around the function to denote the active arrays. select and activate the cell and Under Construction
The array function is one of the most powerful tools in the excel arsenal. It is also one of the most resource hungry. In large spreadsheets, I will only resort to this tool if nothing else can do the job. Sometimes, this is the only tool capable. I have used it to parse out maximums of subsets of huge swaths of data. As an example, to get the maximum load for a specific member from a library of shapes that include an entire analysis model. Without subdividing the data, I could Identify a maximum, minimum or even an average from 10,000 members, each with 800 load values. That is 8,000,000 values that have to be searched. There are more issues when searching a database of such scale, but those will be covered in the Good Practices for Large Spreadsheets section below.
For the described functions, I will be working with the AISC database. The filter will be trying to isolate the W12 shape family.
The first calculation will count the number of values which are in the W12 shape family. You will note a repeated "LEFT(?,3)". This function truncates the shape (W12x19) down to three characters (W12). This creates the match that will be used in the function. The steps of these tasks are as follows:
1. Create a Test; This example uses an IF statement that operates on an array, and returns a 1 for true and a 0 for false.
2. Sum the Test; Since this only needs a total, we will sum the 1's to get a count of W12s.
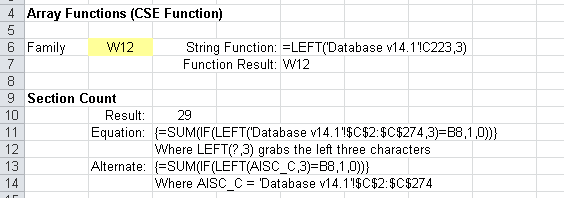 Image 7: Array Function - Count or Sum
The next calculation will look for a maximum and a minimum for the Area values in the W12 shape family. The steps of these tasks are as follows:
1. Create a Test; This example uses an IF statement that operates on an array, and returns a 1 for true and a 0 for false; Note that when searching for a minimum, the false value is set to a huge number to remove those options from contention for the minimum value.
2. Multiply the Test; This will zero out values in the max case, or amplify them out of contention for the maximum.
3. Max or Min of Product; Function will find the appropriate value form the set.
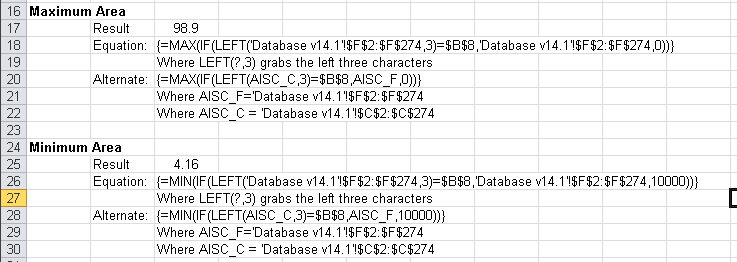 Image 8: Array Function - Maximum and Minimum
This is a two stage array function to calculate an average of the Area values in the W12 shape family. We will sum the areas and then divide it by the count, which was determined earlier. The steps of these tasks are as follows:
1. Create a Test; This example uses an IF statement that operates on an array, and returns a 1 for true and a 0 for false; This test will repeat in the numerator and the denominator.
2. Multiply the Test by the area in the numerator; This will zero out values taht do no meet the test.
3. Sum the Area Results.
4. Divide by Count Function.
 Image 9: Array Functions - Average
I will not pretend to know everything that can be done with an array, but I will show how to implement conditional maximums, minimums and an average. My best advice is to think like a programmer try it. Remember that the arrays must be the same length and make sue of the "Evaluate Function" button. Also, these functions are in the linked excel file in the left column on the Array Tab.
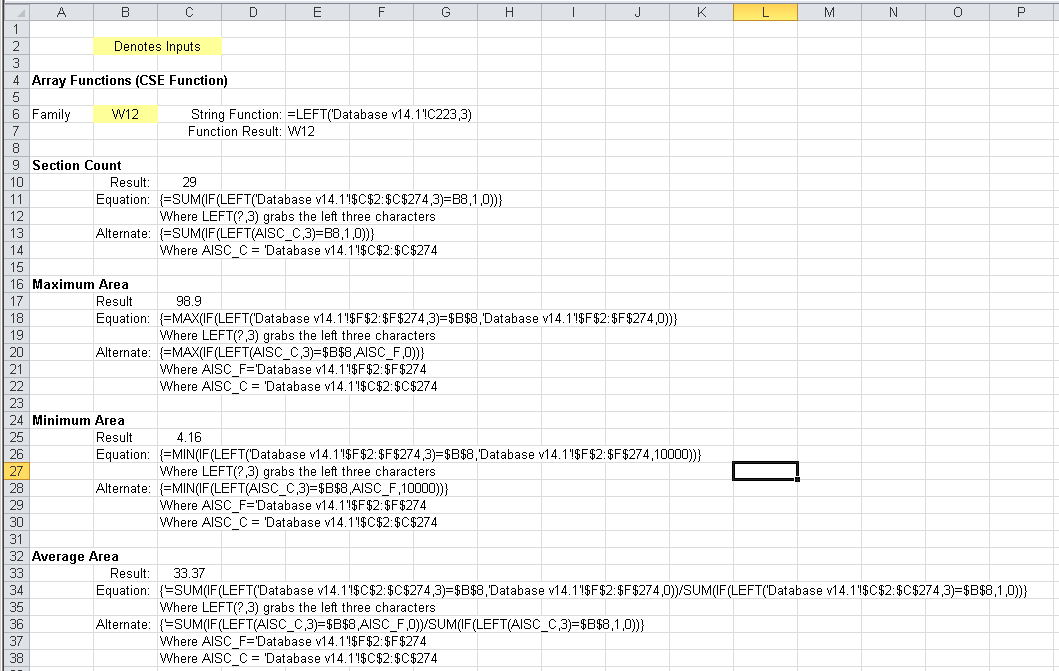 Image 10: Array Spreadsheet
Filters allow you to create subsets of information. Any test developed to create an array function can be tested using these filters. Another use is to parse out subsets of information for further study. As an example, you could export all the reactions form a finite element analysis, filter for nodes or load cases of interest and copy the contents to another tab. Or you could operate on the subset using the subtotal functions (more below).
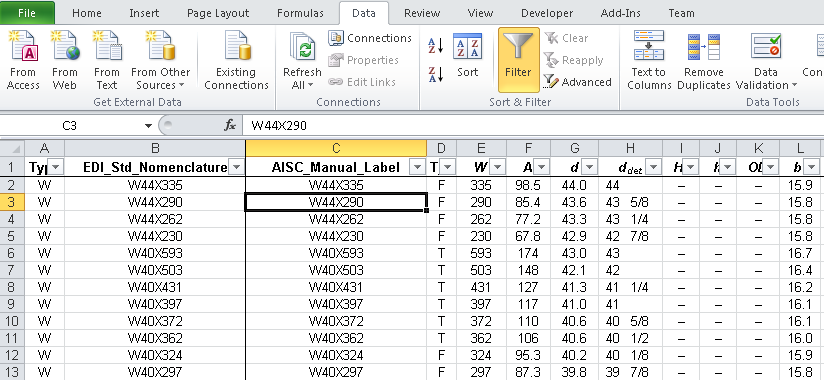 Image 11: Filter View
You can activate a filter by selecting the row at the top of the dataset and selecting the Filter button on the Data Ribbon, shown above. The filter can operate on text data or numeric data, and it provides different filter options depending on the type of data.
 Image 12: Filter Options - Text Data
The filters for text can find exact matches or partial matches. See the image above for a list of the options available.
 Image 12: Filter Options - Numeric Data
The filters for numbers are more extensive than the text options, including Top 10 and options based on averages. See the image above for a list of the options available.
 Image 14: Array Functions - Average
If all else fails, you can select the custom filter, which has all the options in both of the referenced lists above. I like to use this to set two parameters at once to get the subset I desire. Sometimes I will duplicate columns to allow me to filter for four or more values. This is a very powerful tool that you can explore further on your own.
If you want to perform calculations on filtered data sets, you cannot use the standard functions. The standard functions will still operate on the hidden cells. The SUBTOTAL function is provided to perform these operations.
= SUBTOTAL(function number, ref1, [ref2], ...)
The function numbers cover most numerical funcitons; see the image below or try it out yourself.
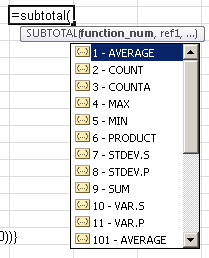 Image 15: Subtotal Function
When spreadsheets become large, the files can begin to become slow and sometimes unstable. This starts to occur around 150MB and gets worse as the file grows. There are some things that you can do to make the file more user-friendly.
1.) Turn Off AutoCalculate - Ribbon > Formulas > Calculation Options > Manual; This allows you to run the sheet only after you have made the necessary changes. On manual, hitting F9 will calculate the entire workbook, and F9 + SHIFT will calculate the active sheet only. This can be good to limit how long a sheet will pause the calculate.
2.) Run Calculations Linearly - In a worksheet, run calculations in order of required completion form left to right or from up to down. Do not make calculations dependant on cells below or to the right of the active cell. This is due to the organization of the solution engine, which goes from upper left to lower right. Similarly, limit references to other worksheets and other files. These operations further delay processing of a workbook.
3.) Change the number of Threads Available - Ribbon > Files > Options. Select Advanced. SCroll down to "Formulas." Set to Manual. Set to desired value. This allows a user to determine how many threads will be used while solving the sheet. I have built sheets that could take 90 minutes to calculate. When working with these sheets, I reduced the threads to 7 on an 8 core machine to allow me to still work on the computer while it was calculating.
4.) Limit the Number of Array Functions - Array Functions are very resource intensive. If I can use simple functions, I will. Sometime it is unavoidable, but I still try to avoid them.
5.) Do not use custom functions (VBA) when native functions can do the job. Native functions have efficiencies that you cannot achieve in the VBA back end.
I may add to this from time to time as I discover more.
I do not use them. I do not like them. Google them to find out more. They are useful, but the limitations are too great in my opinion to make it worthwhile to explain their use. I still mention them so you can explore on your own.
Did you know that there is a hidden programmer interface behind MS Excel? Many do not. WHen you are in MS Excel, hit "ALT + F11" to open the VBA back end.
Once you do this, you will see an interface that is vaguely reminiscent of Visual Studio. It includes a Project Window, Properties Window, Immediate Window and a Watches Window. If any of these are not present for you; and you want to add them the view menu lists them as options to be selected. The image below shows all these options. I will get into the use of each of these as I get into the development processes.
 Image 1: VBA Interface
In this interface you can create create UserForms, Modules, and Class Modules. I will only be dealing with the Module option in this page. Feel free to Google the other types of objects. To create a module, you can right click on the VBA Project and select "Insert > Module". The Module will open automatically.
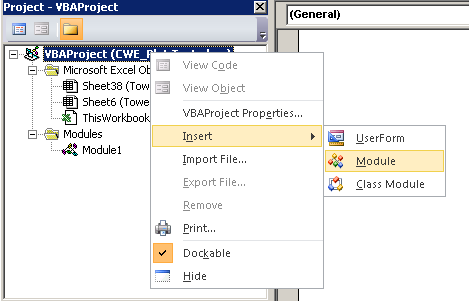 Image 2: Add Modules
With the module created, it will show up in the Project window under the spreadsheet you have open. If you have multiple sheets open, make sure it is in the correct file. Select the Module in the Project window, and you will notice the (Name) variable in the Properties window, as shown in Image 1. You can change this to rename the module. I prefer to make the name something descriptive. Nothing is worse than trying to rework code in five modules names Module1, Module2, etc.
With the module created and renamed, we can start coding. Here is my version of "Hello World". I call it my RecordKeeper. I use it in larger applications to keep track of how a complex script is processing; similar a long output from an analysis platform. It posts a time and message to the next blank line of a spreadsheet. It will serve as a good first script for those who have never scripted before.
Below is am image of the actual code from excel. The first thing that must be created is the "Sub" line, which is used to identify the Subroutine. In VBA, the End Sub line will be created automatically. All the operations that the subroutine will perform must be between the Sub and End Sub. When Naming a sub there are certain restrictions such as no spaces and the only symbol allowed is underscore. VBA will give an error if you use a name that is not permitted. Next we must define any variables that we will use. I define and "i" variable as an integer which is a common counter variable. It will be used to count down to the first empty row. Then I define the start value of "i = 3" because I want it to start counting at the third row (you will see why later). Next we must perform the counting. To do this, I will introduce two new concepts: Cell References and Loops.
 Image 3: Record Log 1
There are two ways to access a cell form a spreadsheet that I use regularly in VBA. First we must identify the worksheet being accessed, which for this script is "Sheet2". Every thing will build off this Sheet2 object. Think of Cell "A3" on a spreadsheet, if I want to access the information in A3, I must point VBA to the cell. The first way is "Sheet2.Range("A3"). This is useful that a reference will remain static (it won't move). It is also useful if you are operating on a set of cells, such as "Sheet2.Range("A3:A500"). The second way is a cell coordinate reference technique: "Sheet2.Cells(3,1)". This works by identifying the Row and Column numbers in an (y,x) format. The upside of this is that it lets you input variables which lets you change cells in a loop or a conditional statement. As you can see above, the cells option is what I used in the RecordLog subroutine with the row number replaced by a variable to let me move the reference where I need it.
Loops allow you to repeat commands or processes. There are may types of loops, but the ones I use most are: For, Do Until, and Do While. There are more loop types, but I will not be discussing those. Below is a general syntax for creating my preferred loops. For the RecordLog, I created a Do Until loop with with a conditional statement that is looking for a blank cell (""). If the cell is not blank, it will take the initial i value and add one to it ( i = i + 1 ). When it finds the blank cell, it will terminate the loop.
			'*** For Loop ***
			for i = [Loop Range as 0 to 100]
				[Repeated Commands]
			Loop

			'*** Do While Loop ***
			Do Until [Conditional Statement]
				[Repeated Commands]
			Loop

			'*** Do While Loop ***
			Do
				[Repeated Commands]
			While [Conditional Statement]
The last part of the assignment of text to the blank cell identified in the loop. "Date" and "Time" are default VBA variables and the "&" is concatenates the text into a single string. The second text assignment just sets the value to the string defined by the quotes.
There are many ways to do what I do in the first macro. The image below shows another way of doing the same task with more flexibility.
 Image 4: Record Log 2
The first change is the addition of a "SheetX" as a Worksheet variable. This allows me to change which sheet is the sheet being operated on without changing all the lines of code. That is important when dealing with really long subroutines with may references. Next, I assign SheetX to equal a sheet named "Log". This would work for any other Sheet Name. I regularly create a SheetX, SheetY and even a SheetZ if needed to keep the references generic.
The second change is to eliminate the loop by using some of Excel's built-in functionality. "WorksheetFunction.Max" finds the maximum of the 2 value or the result of the Excel operation. The Excel operation is the command equivalent of selecting column A, going to the bottom the spreadsheet(Row 1.04 million) and hitting control up, which will move the selection to the last cell in the column with data. "Rows.Count" provides the row number for the active cell. I add 1 to get to the blank cell below the last cell with data.
These changes make it possible to do more with flexibility to change or modify the subroutine in the future. With subroutines that populate cells, it is necessary to clear those cells. The subroutine below is used to clear the cells that get populated by the previous subroutines.
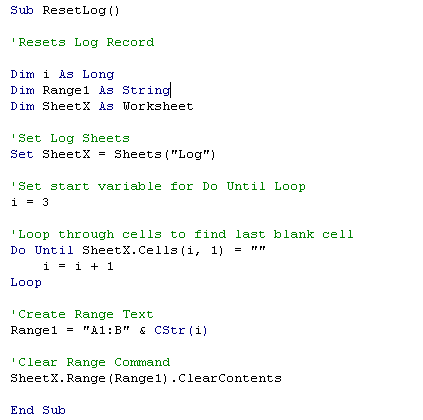 Image 5: Reset Macro
The image below shows the operational Log sheet. Three buttons were created in the first two rows to call each of the three described subroutines.
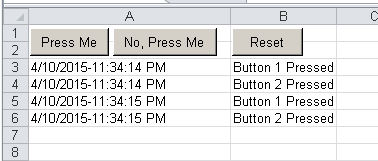 Image 6: Log Spreadsheet
The buttons may be created from the button tool in the developer tab. Once the button is drawn, you can assign the macro to the button by right clicking and selecting "Assign Macro."

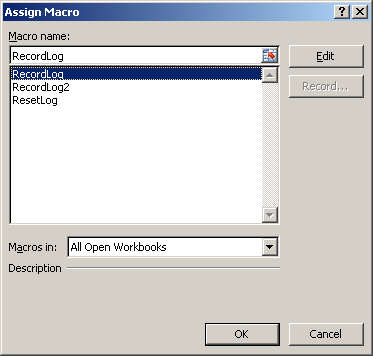 Image 7 & 8: Assign Macro Form and Macro Menu
So that is a basic intro to creation of a subroutine to be accessed from a spreadsheet. Next I will discuss functions.
Functions are subroutines that return a single value. These are useful within subroutines or in excel sheets. The image below shows a function called "AISC" being implemented.
 Image 9: Function Implemented
The function does a horizontal and vertical lookup to select the appropriate value from the AISC Database. The code may be viewed in the image below or in the VBAExamples File.
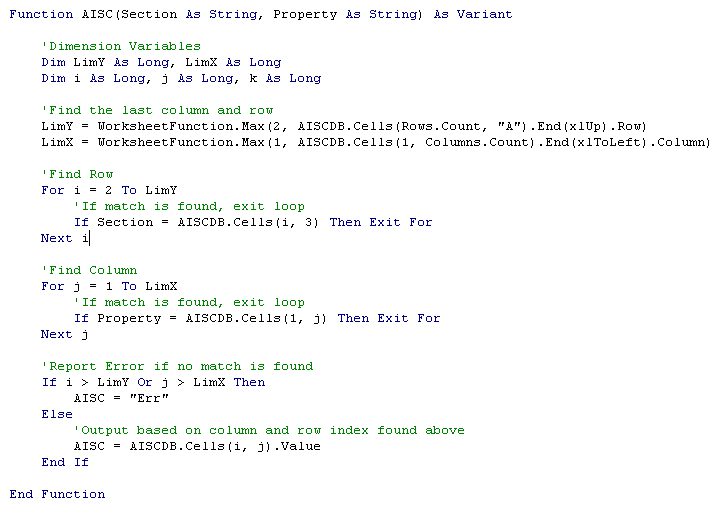 Image 10: Function Code
The Function utilizes loops and code that should be familiar from the above examples until you get to the "IF" statement. That is the first example of a boolean statement. Refer to the Boolean Section below for more detail on how it works.
For the Function, the first task is to define the function name and inputs. This part is very similar to a Subroutine, excepting that at the end of the definition you define the type of output from the function. The operation within works exactly like a subroutine, excepting the last task, which is to assign the function name as the desired result.
Several boolean operators exist within VBA. Technically the loop conditions are boolean operators. I will only deal with "If..Then..Else" statements.
			'*** If Statement ***
			If [Conditional Statement] then
				[Statement]
			End If

			'*** If Else Statement ***
			If [Conditional Statement] then
				[Statement]
			ElseIf [Conditional Statement] then
				[Statement]
			Else
				[Statement]
			End If
The addition of the "Else" and "ElseIf" allow you to link multiple conditional statements. Remember that only one of a linked set of statements within the If section will be executed and that it will be the first set that proves true. If none prove true, an "Else" conditional at the end will be executed. If no "Else" conditional is provided, then nothing will be executed.
Conditional Statement is a statement to return a Boolean result of True or False, which will determine if the following statements are executed. The format of the statement is usually follows a format of "X = Y". The "=" operator represents a test for equal values. Several other operators listed below: X > Y - X is greater than Y X >= Y - X is greater than or equal to Y X < Y - X less than Y X <= Y - X is less than or equal to Y X <> Y - X is not equal to Y
Clever application of these can allow you to build almost any type of system check you can imagine. Sometimes is may require nesting of multiple options. In the previous example, I used an "Exit For" in a statement to end a loop which has reached a result.
Statement is a set of commands that are executed if the conditional statment is true.
It may be useful to use different variable types. The following is a list of variables available:
Byte is a data type used to hold positive integer numbers ranging from 0 to 255.
Boolean is a data type with only two possible values, True (-1) or False (0).
Integer is a data type that holds integer variables stored as 2-byte whole numbers in the range -32,768 to 32,767.
Long is a 4-byte integer ranging in value from -2,147,483,648 to 2,147,483,647.
Currency is a data type with a range of -922,337,203,685,477.5808 to 922,337,203,685,477.5807, which is used for calculations involving money and for fixed-point calculations where accuracy is important.
Single is a data type that stores single-precision floating-point variables ranging in value from -3.402823E38 to -1.401298E-45 for negative values, and 1.401298E-45 to 3.402823E38 for positive values.
Double is a data type that holds double-precision floating-point numbers in the range -1.79769313486232E308 to -4.94065645841247E-324 for negative values; 4.94065645841247E-324 to 1.79769313486232E308 for positive values.
String is a data type consisting of a sequence of contiguous characters that represent the characters themselves. A String can include letters, numbers, spaces, and punctuation. The String data type can store fixed-length strings ranging in length from 0 to approximately 63K characters and dynamic strings ranging in length from 0 to approximately a billion characters.
Object is a data type that represents any Object reference.
Variant is the catch all variable. All variables become Variant data types if not explicitly declared as some other data type. Variant data type A special data type that can contain numeric, string, or date data as well as the special values Empty and Null.
While not a comprehensive list, this is sufficient to accomplish much in VBA.
This concludes the introduction to VBA. I encourage you to plan out what you would like to do and use Google to find helpful examples. Also, you can pickup a books on Excel VBA. My experience is that it will give you information on syntax, but not help you figure HOW to accomplish your goal. Some things are dependant on your own ability to plan out the steps needed to finish a task. Good Luck and Happy Programming!
If you have read through the Advanced Excel and VBA sections, then you may be ready to start taking on more advanced uses of Excel. The fun part is that the sky is the limit. The discipline learned in excel programming can even prepare you to do your own projects in visual studio express. But I am getting ahead of myself. To begin we will start some background.
First you must determine what you would like to do. For the purposes of this exercise, I will set a task and plan which I will run through in the successive sections. For this exercise, I want to develop a file logging system. It will search a specified windows directory for files and list all files that meet the criteria in an excel sheet. To do this, we will need to interface with MS Windows. This will require us to determine how to interface with windows.
Unless you have a good reference, such as a website or a book, I recommend starting with a search engine. The search I would conduct would be: VBA windows reference file object. I selected these terms with specific intent. VBA to focus the search on VBA pages. Windows Reference to focus it on VBA references. File Object because your to goal is to operate on file structures or individual files.
I cannot teach you how to run through the search results, but you can try it yourself. The search yields a list of websites that reference a File System Object that can be found in the Scripting Runtime Reference. This is enough information to know that you can do a more specific search for the File System Object.
You have learned about the existence of the File System Object. You need to add it to your project. The first step is to add the required references to use the File System Object. Image 1 shows where the references may be found in the VBA Menu structure.
 Image 1: Reference in Menus
When you select the References, the next image shows the menu that will appear. This is a listing of every API available for use on your computer. As it turns out, the File System Object is available in at least two Reference Files: Windows Script Host Object Model (WSHOM), Microsoft Scripting Runtime(MSR).
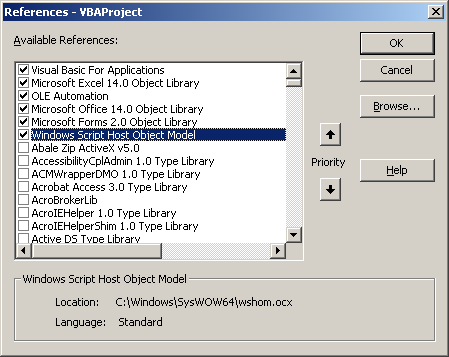 Image 2: Reference Window
I prefer the WSHOM, selected in Image 2, over MSR because it has more tools. WSHOM has additional access to network objects, windows registry functions, shell methods, and can create or modify shortcuts. It is a more useful as you may choose to expand your application. You can load any typ or API reference with these menus, and the next
Once you have a reference loaded, you can check into all the functions available using the Object Browser. To start the Object Browser, you can find it in the View Menu, or by hitting the F2 key. Image 3 shows the browser. By default, all object and funciton available are shown. The menu at the top may be used to filter the list to a specific reference. In Image 3, WSHOM is selected.
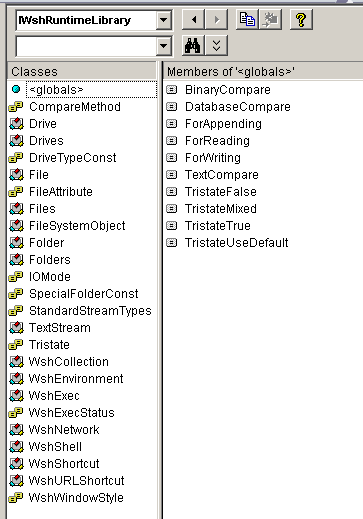 Image 3: Object Browser, WSHOM Selected
You can select a Class to get down the individual functions(yellow icon) and objects(blue/white icon). If I select the File System Object, the list refreshes to the functions available to that class. You can select a function and get some syntax for use in the grey portion of the window at the bottom, which is shown in Image 4 for the CopyFile function.
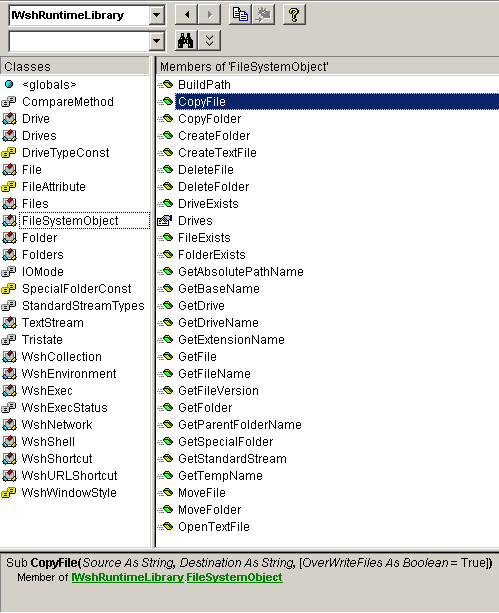 Image 4: Object Browser, File System Object Selected
You may also want to perform some searches on the individual functions to see how others use them in applications.
With the Objects setup, the next step is to plan out your application. You will need to design variables to store the file and folder information. You will need to output the search results the a sheet and you will have to loop through the files and folders to make that happen. The code section below contains a modified version of the code provided in my File Logger, which can be downloaded from the link in the left margin.
		'Execute Code
		Public Function Execute() As Long

			'Create a Collection of Files
			Set FoundFiles = New Collection

			'Compile Collection of Files; LookIn is the Search Directory
			Call collectFiles LookIn

		End Function

		'Collect Files Function
		Private Function collectFiles(sDirName As String)

			'Dimension File System Object
			Dim fs As FileSystemObject
			Set fs = New FileSystemObject

			'Dimension All Files
			Dim allFiles As IWshRuntimeLibrary.Files
			Dim aFile As IWshRuntimeLibrary.File

			'Sets the Files to the contents of a folder
			Set allFiles = fs.GetFolder(sDirName).Files

			'Loop Through All Files
			For Each aFile In allFiles

				'Comparison of Search to Search Criteria
				If UCase(aFile.Name) Like UCase(fileName) Then
					'Add To list if it meets the Search Criteria
					FoundFiles.Add aFile.Path
				End If

			Next

			'Recursively crawl through subfolders
			If Me.pSearchSubFolders Then

				Dim allFolders As IWshRuntimeLibrary.Folders
				Set allFolders = fs.GetFolder(sDirName).SubFolders
				Dim aFolder As IWshRuntimeLibrary.Folder

				'Loop Through Folder List
				For Each aFolder In allFolders
					collectFiles aFolder.Path
				Next

			End If
		End Function
As I continue to build applications that utilize additional references, I will add sections with useful code to this Lab. I work extensively in excel and frequently use it to take over other software. My past interfacing applications have included Windows Tools, Autodesk AutoCAD, Computers and Structures(CSI) SAP 2000, CSI ETABS, Trimble Tekla, Strand 7, and PTC Mathcad. Check back for these updates.